Kamis, 12 Februari 2009

cara menyeting DNS windows server 2003


1. Installing DNS on Windows Server 2003:

If using the new style Start menu: Click on "Start", "Control Panel", "Add or Remove Programs" and select the "Add/Remove Windows Components" tab on the left-hand side.

If using the "Classic" style Start menu: Click on "Start", "Settings", "Control Panel", "Add or Remove Programs" and select the "Add/Remove Windows Components" tab on the left-hand side.

In the "Windows Components Wizard", highlight the "Networking Services" and press the "Details" button. The screen below will be displayed (Fig 1).

Figure 1
Figure 1 - The Application Server Screen

Then, check "Domain Name System (DNS)" as shown in Figure 2 below and click "OK" to close each window and "Next" to install DNS. You will be asked to insert your Windows Server 2003 disk. Click "Finish" once the installation is complete.

Figure 2
Figure 2 - The Networking Services Screen

You have now installed DNS.


Figure 3
Figure 3 - Where to find the IIS Manager

2. Where to find the DNS Manager:

If you are using the new style Start menu, you can reach the Internet Information Services console by clicking "Start", "Administrative Tools" and selecting "DNS" from the list in figure 3 above.

If you are using the "Classic" style Start Menu, you can reach the console by clicking "Start", "Programs", "Administrative Tools" and select "DNS" from the list in figure 3 above.


Figure 4
Figure 4 - Select Configuration Action

3. Configure your DNS Server:

Right-click on your server name in the list on the left-hand pane and select "Configure a Server". The "Configure a DNS Server" Wizard will start. Click "Next".

On the "Select Configuration Action" screen (shown in Figure 4 above) select "Create a forward lookup zone (recommended for small networks)" and press "Next".


Figure 5
Figure 5 - Adding a new "Zone"

4. Adding a new "Zone":

Simply enter the name of a suitable domain which you intend to use internally. I am going to use my own domain and add appropriately named "subdomains" to access internal network resources. For example, to access my Intranet, I will enter http://intranet.simongibson.com where "intranet" is the subdomain.


Figure 6
Figure 6 - The Zone File

5. The Zone File:

DNS information is stored in a file within the system32 folder. The "Zone File" screen simply gives you the opportunity to use an existing backup file or create a fresh one. In our case, we will simply create a fresh file. Press "Next".


Figure 7
Figure 7 - Dynamic Update

6. Dynamic Update:

As my server is not part of a Directory I am going to opt not to allow dynamic updates as shown in Figure 7 above. Press "Next".


Figure 4
Figure 8 - Adding Forwarders

7. Forwarders:

Forwarders will allow non simongibson.com requests to be answered by other DNS Servers. In this case, I have entered the IP addresses for my ISP's DNS Servers so I can still browse the Internet. Only simongibson.com requests will be answered by our internal DNS Server, everything else will be answered by the external DNS servers shown in Figure 8 above.

To complete the "Configure a DNS Server" wizard, click "Next" and "Finish".


Figure 9 - Adding a new Host

8. Adding a new Host:

Now that our DNS Server is operational, we need to add a Host name. As I have set up IIS to use "Host Headers" I need to create an entry for my Intranet (see IIS6 tutorial here). This is going to be intranet.simongibson.com.

To add the new Host, right-click in the white space in the pane on the right and select "New Host (A)..." from the menu that appears (as shown in Figure 9 above).

In my case, my website is hosted externally so I will need to add another Host called "www" which will point at the IP of the web server on which it is hosted. I will also need to do the same for my email by adding a "mail" host.


Figure 10 - The New Host

9. The New Host:

As illustrated in Figure 10 above, type the subdomain name into the upper box and the IP address it should forward to (in this case, the web server) in the lower box. Then press the "Add Host" button. A message will then appear indicating if the new host was successfully added after which you can either add more hosts or press "Done" to close the "New Host" screen.


Figure 6
Figure 11 - Configuring your client PCs (Windows XP)

10. Configuring your client PCs (Windows XP):

To configure your client PCs to use the new DNS Server you will need to make a change to their network settings.

To do this, right-click on "My Network Places" and select "Properties". Then, right-click on "Local Area Connection" and select "Properties". Select "Internet Protocol (TCP/IP)" from the list and click "Properties". The screen shown in figure 11 will be shown.

Ensure that the "Use the following DNS server addresses" radio button is selected and enter the IP address of your new DNS Server into the "Preferred DNS Server" box and press "OK". The client PC will now use your new DNS Server.

Alternatively, where you have access to a DHCP server, you can configure it to issue the IP address of the new DNS server to all your client PCs automatically. This is the preferred method of assigning a DNS server and the method I use in my internal network.

FTP

FTP (singkatan dari File Transfer Protocol) adalah sebuah protokol Internet yang berjalan di dalam lapisan aplikasi yang merupakan standar untuk pentransferan berkas (file) komputer antar mesin-mesin dalam sebuah internetwork.

FTP merupakan salah satu protokol Internet yang paling awal dikembangkan, dan masih digunakan hingga saat ini untuk melakukan pengunduhan (download) dan penggugahan (upload) berkas-berkas komputer antara klien FTP dan server FTP. Sebuah Klien FTP merupakan aplikasi yang dapat mengeluarkan perintah-perintah FTP ke sebuah server FTP, sementara server FTP adalah sebuah Windows Service atau daemon yang berjalan di atas sebuah komputer yang merespons perintah-perintah dari sebuah klien FTP. Perintah-perintah FTP dapat digunakan untuk mengubah direktori, mengubah modus transfer antara biner dan ASCII, menggugah berkas komputer ke server FTP, serta mengunduh berkas dari server FTP.

Sebuah server FTP diakses dengan menggunakan Universal Resource Identifier (URI) dengan menggunakan format ftp://namaserver. Klien FTP dapat menghubungi server FTP dengan membuka URI tersebut.

Cara kerja protokol FTP

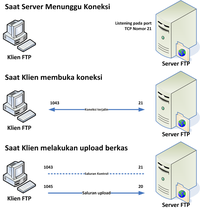
FTP menggunakan protokol Transmission Control Protocol (TCP) untuk komunikasi data antara klien dan server, sehingga di antara kedua komponen tersebut akan dibuatlah sebuah sesi komunikasi sebelum transfer data dimulai. Sebelum membuat koneksi, port TCP nomor 21 di sisi server akan "mendengarkan" percobaan koneksi dari sebuah klien FTP dan kemudian akan digunakan sebagai port pengatur (control port) untuk (1) membuat sebuah koneksi antara klien dan server, (2) untuk mengizinkan klien untuk mengirimkan sebuah perintah FTP kepada server dan juga (3) mengembalikan respons server ke perintah tersebut. Sekali koneksi kontrol telah dibuat, maka server akan mulai membuka port TCP nomor 20 untuk membentuk sebuah koneksi baru dengan klien untuk mentransfer data aktual yang sedang dipertukarkan saat melakukan pengunduhan dan penggugahan.

FTP hanya menggunakan metode autentikasi standar, yakni menggunakan username dan password yang dikirim dalam bentuk tidak terenkripsi. Pengguna terdaftar dapat menggunakan username dan password-nya untuk mengakses, men-download, dan meng-upload berkas-berkas yang ia kehendaki. Umumnya, para pengguna terdaftar memiliki akses penuh terhadap beberapa direktori, sehingga mereka dapat membuat berkas, membuat direktori, dan bahkan menghapus berkas. Pengguna yang belum terdaftar dapat juga menggunakan metode anonymous login, yakni dengan menggunakan nama pengguna anonymous dan password yang diisi dengan menggunakan alamat e-mail.

Selasa, 10 Februari 2009

DHCP server

DHCP Server tuh adalah server yang berfungsi untuk memberikan IP Address otomatis kepada komputer client. Jadi komputer client gak perlu di set IP Address satu per satu. Bayangkan kalau ada 1000 komputer *bayangin* wah cape dwehhh…

Oke langkah pertama untuk instalasi adalah masukkan CD-ROM Microsoft Windows Server 2003 ke CD-ROM. Lalu pada control panel ( Start > Control Panel ) pilih Add or Remove Programs. Setelah window Add or Remove Programs terbuka, click icon Add/Remove Windows Components maka akan muncul Windows Components Wizard, pada kotak Components pilihlah Networking Services lalu click Details.

Pada window Networking Service, pilih Dynamic Host Configuration Protocol (DHCP) lalu click OK dan akan kembali ke window sebelumnya lalu click next. Maka instalasi DHCP akan berjalan. Sekarang kita sudah punya DHCP Server untuk konfigurasi silahkan liat tutorial selanjutnya ya…

Fungsi DHCP Server sudah terinstal, sekarang kita akan meng-konfigurasinya agar berdaya guna… Langkah pertama adalah kita buka DHCP dari Start > All Programs > Administrative Tools > DHCP. Setelah window DHCP terbuka, click kanan pada ja-file.jakarta.darinol [10.61.0.1] dan pilih New Scope. Lalu akan muncul New Scope Wizard, pilih saja next. Pada Scope Name isi Jakarta dan description isi DHCP untuk Jakarta. Atau terserah anda mau isi apa di atas hanya sekedar contoh. Ok, sekarang tekan Next.

Pada IP Address Range, kita akan membuat range untuk DHCP dari 10.61.0.30 - 10.61.0.250. untuk itu isi di Start IP address : 10.61.0.30 dan pada End IP address: 10.61.0.250 dan untuk Subnet mask: 255.255.255.0

Kita lewati Add Exclusions dengan click next. Eclusion adalah IP-IP yang tidak akan ter-DHCP. Sebagai contoh mungkin kita sudah memakai IP 10.61.0.111 untuk printer, kita dapat memasukkan IP 10.61.0.111 di dalam Add Exclusion isi Start IP address dan End IP address dengan IP 10.61.0.111 dan click Add. Maka IP ini tidak ada ter-DHCP. Click next.

Pada Lease Duration, kita tetap memilih default 8 hari. Ini berguna untuk meng-available-kan kembali IP yang sudah terpakai setelah 8 hari kosong. Click next. Pada window Configure DHCP Option pilih Yes dan click next.

Masukkan IP router pada window Router dan click next. Pada window Domain Name and DNS Server isi IP address dengan 10.61.0.1 dan click next. Kita akan lewati window WINS Server dengan click next. Pada Activate Scope pilih Yes dan click next. Setelah itu click finish.

DHCP Server tidak langsung berjalan, kita harus meng-authorize-nya dulu dengan cara click kanan pada ja-file.jakarta.darinol dan pilih Authorize. Setelah itu click tombol refresh pada Toolbar. Maka DHCP Server-nya sudah aktif

Sebelum membuat group-group untuk user, kita akan me-Raise Domain Functional Level dari native Windows 2000 ke Microsoft Windows Server 2003. Pada functional level ini maka kita dapat membuat group-group yang hierarki (turunan) yang hal ini tidak didapat pada functional level native Windows 2000.

Agak bingung memang, tapi nanti di tutorial selanjutanya kita akan meng-implementasikannya sehingga jelas, OK…

Untuk melakukan hal ini, pertama kita membuka Active Directory Users and Computers. Click kanan pada jakarta.darinol lalu pilih Raise Domain Functional Level. Pada window selanjutanya pilih Microsoft Windows Server 2003 lalu click OK.

DHCP itu adalah suatu fasilitas pemberian IP secara otomatis oleh Server PC di dalam Networking
kepada Client PC.

Pada dasar DHCP ini biasanya sudah terintegrasi pada OS yang khusus untuk Server seperti
Ms-Windows 2000 Server/Advanced Server, Windows NT Server, Windows Server 2003 dll.

Sedangkan untuk PC client biasanya dengan OS WIndows XP, Windows 2000, Windows NT Client, dan
Windows 9X dan ME, sudah terintegrasi dengan Service DHCP Client.

Tentunya hal ini haruslah dilakukan setting pada Server agar service DHCP Server aktif untuk
memberikan IP kepada Client secara otomatis setiap kali PC Client dinyalakan atau pun dihubungkan
ke Networking.

Setelah DHCP Server diaktifkan pada PC Server, maka cukup di server saja yang diberikan IP secara
manual, misalnya 192.168.0.1, netmask 255.255.255. 0 dan default gateway 192.168.0.1.

Sedangkan untuk Client kita harus set IP nya pada Network Properties dengan pilihan Obtain an IP
Address Automatically.

melalui COmmand Prompt di PC Client kita dapat mengetikan perintah IPCONFIG (pada windows XP,
Windows 2000/NT) atau juga WINIPCFG pada Windows 9x dan ME.

maka secara otomatis IP address dynamic (yang dapat berubah setiap kali PC Client
dinyalakan/dimatika n, atau pun diputus/disambung kan ke Network).

Pemberian IP secara otomatis kepada Client dengan DHCP ini biasanya dilakukan agar tidak terjadi
IP ADDRESS CONFLICT dikarenakan sudah adanya PC Client lain yang menggunakan IP yang sama dengan
yang sedang kita set.

Web server windows 2003

Web Server di Windows 2003

Sebelum menambahkan komponen IIS, sebaiknya di NIC yang digunakan sudah terpasang IP Address, misalnya 192.168.55.110, begitu juga DNS dan lain-lain sudah Anda instalasi. Setelah itu baru Anda instalasi IIS lengkap dengan komponen lainnya.

Web Server di Windows Server 2003 atau Windows Server 2003 R2 menggunakan Internet Information Services 6.0 yang merupakan suatu layanan berbasiskan protokol HTTP (HyperText Transfer Protocol) yang bekerja secara default di port TCP 80 sedangkan untuk secure HTTP menggunakan SSL Port 443. Client menghubungi web server menggunakan HTTP Client atau web Client misalnya Internet Explorer. Client menghubungi Web server dengan memasukkan URL (Uniform Resource Locator) Address. Misalnya wss-id.org

Ada URL Address yang bisa digunakan Client:

  • Domain Name : http://wss-id.org
  • Nama Host : http://server atau http://server.wss-id.org
  • IP Address : http://192.168.55.110

IIS merupakan salah komponen Windows 2003 yang dapat diinstall melalui Windows Component di Add/Remove Programs Control Panel. Setelah itu Anda tinggal memberi tanda pada pilihan yang bersangkutan dan melanjutkan pekerjaan dengan mengikuti pernyataan yang ditampilkan program.

Apabila Anda akan membuat Web Server langkah yang harus Anda lakukan di Internet Information Services Manager adalah sebagai berikut:

  1. Buka Internet Information Services Manager dari Start – Programs – Administrative Tools.
  2. Klik kanan Web Site dan pilih New – Web Site
  3. Klik Next untuk melanjutkan. Isi deskripsi untuk web site tersebut dan klik Next.
  4. Masukkan IP Address dan TCP Port dan klik Next untuk melanjutkan.
  5. Masukkan home direktori untuk web site, lalu klik Next
  6. Biarkan pilihan Read dan Run Script, klik Next lagi.
  7. Klik Finish untuk mengakhiri pekerjaan Anda.

Sebenarnya masih banyak lagi hal-hal lain yang perlu ditambahkan, hal ini tergantung web aplikasi yang akan digunakan.

Setting DNS Windows server 2003

Install DNS lewat add remove program, setelah diinstall setting ip misal:

ip address : 192.168.1.1
subnet : 255.255.255.224
dns server : 192.168.1.1

dibagian advance masukkan dns suffix for this connection, misal test.domain

lalu setting computer name

mycomputer>property>change> ganti computer name, misal server
lalu klik> more, masukkan primary dns suffic, test.domain

lalu restart komputer.

masuk ke DNS, administrative tool>DNS

klik kanan forward zone >new zone:
pilih primary, masukkan domain (test.domain), finish
klik kanan reverse zone > new zone:
pilih primary, masukkan ip ntwork(192.168.1), finish

setting DNS selesai.

setting domain:

start >run, ketik dcpromo
next(sampai ketemu domain name),masukkan domain test.domain, next, jika ada kegagalan cek lagi setting sebelumnya, finish.

domain server beres.
untuk membuat user klien:
cocokan dulu policy domain security policy dengan domain controller security policy:
start>administrative>domain security policy/controller security policy>account policy>password policy:

`enforce pasword : 5
`max password age :7
`minimun pass age :1
`minimum pass lenght : 6
`pass mus meet complex:disabled
`store password :not defined

samakan settingan pasword policy antara domain security policy dengan domain controller security policy. setting bebas yg penting keduanya disamakan.
restart komputer.

add user:
start>administrative>active directory user & computer

new user>next>finish

setting join domain di klien:
klik kanan my computer>computer name>change>masukan domain (test.domain)>restart komputer

jika gagal, set manual:

`di ip setting :
dns suffix : test.domain
dns server : 192.168.1.1
`propety my computer>change>more>masukan test.domain

lalu masukan lagi di propety my computer> masukkan domain (test.domain), restart komputer
Setting DHCP Server

instal dhcp melalui add remove program.

klik kanan server>new scope>masukan nama scope (misal test)>
start ip addres: 192.168.1.2
end ip addres : 192.168.1.30
lenght : 27
subnet mask : 255.255.255.224

next>
lease duration : 8

next>
router = 192.168.1.1 (sesuaikan dengan server gateway)

next>
parent domain : test.domain
ip address: 192.168.1.1

next>
wins : 192.168.1.1

finish

klik kanan server>authorize

agar klien dengan ip dynamic gampang mencari domain server, maka tambah kan scope option:
dobel klik server>scope option>configure option>centang netbios over tcp>ok

diambil dari nop13.blogspot.com