Kamis, 12 Februari 2009

cara menyeting DNS windows server 2003


1. Installing DNS on Windows Server 2003:

If using the new style Start menu: Click on "Start", "Control Panel", "Add or Remove Programs" and select the "Add/Remove Windows Components" tab on the left-hand side.

If using the "Classic" style Start menu: Click on "Start", "Settings", "Control Panel", "Add or Remove Programs" and select the "Add/Remove Windows Components" tab on the left-hand side.

In the "Windows Components Wizard", highlight the "Networking Services" and press the "Details" button. The screen below will be displayed (Fig 1).

Figure 1
Figure 1 - The Application Server Screen

Then, check "Domain Name System (DNS)" as shown in Figure 2 below and click "OK" to close each window and "Next" to install DNS. You will be asked to insert your Windows Server 2003 disk. Click "Finish" once the installation is complete.

Figure 2
Figure 2 - The Networking Services Screen

You have now installed DNS.


Figure 3
Figure 3 - Where to find the IIS Manager

2. Where to find the DNS Manager:

If you are using the new style Start menu, you can reach the Internet Information Services console by clicking "Start", "Administrative Tools" and selecting "DNS" from the list in figure 3 above.

If you are using the "Classic" style Start Menu, you can reach the console by clicking "Start", "Programs", "Administrative Tools" and select "DNS" from the list in figure 3 above.


Figure 4
Figure 4 - Select Configuration Action

3. Configure your DNS Server:

Right-click on your server name in the list on the left-hand pane and select "Configure a Server". The "Configure a DNS Server" Wizard will start. Click "Next".

On the "Select Configuration Action" screen (shown in Figure 4 above) select "Create a forward lookup zone (recommended for small networks)" and press "Next".


Figure 5
Figure 5 - Adding a new "Zone"

4. Adding a new "Zone":

Simply enter the name of a suitable domain which you intend to use internally. I am going to use my own domain and add appropriately named "subdomains" to access internal network resources. For example, to access my Intranet, I will enter http://intranet.simongibson.com where "intranet" is the subdomain.


Figure 6
Figure 6 - The Zone File

5. The Zone File:

DNS information is stored in a file within the system32 folder. The "Zone File" screen simply gives you the opportunity to use an existing backup file or create a fresh one. In our case, we will simply create a fresh file. Press "Next".


Figure 7
Figure 7 - Dynamic Update

6. Dynamic Update:

As my server is not part of a Directory I am going to opt not to allow dynamic updates as shown in Figure 7 above. Press "Next".


Figure 4
Figure 8 - Adding Forwarders

7. Forwarders:

Forwarders will allow non simongibson.com requests to be answered by other DNS Servers. In this case, I have entered the IP addresses for my ISP's DNS Servers so I can still browse the Internet. Only simongibson.com requests will be answered by our internal DNS Server, everything else will be answered by the external DNS servers shown in Figure 8 above.

To complete the "Configure a DNS Server" wizard, click "Next" and "Finish".


Figure 9 - Adding a new Host

8. Adding a new Host:

Now that our DNS Server is operational, we need to add a Host name. As I have set up IIS to use "Host Headers" I need to create an entry for my Intranet (see IIS6 tutorial here). This is going to be intranet.simongibson.com.

To add the new Host, right-click in the white space in the pane on the right and select "New Host (A)..." from the menu that appears (as shown in Figure 9 above).

In my case, my website is hosted externally so I will need to add another Host called "www" which will point at the IP of the web server on which it is hosted. I will also need to do the same for my email by adding a "mail" host.


Figure 10 - The New Host

9. The New Host:

As illustrated in Figure 10 above, type the subdomain name into the upper box and the IP address it should forward to (in this case, the web server) in the lower box. Then press the "Add Host" button. A message will then appear indicating if the new host was successfully added after which you can either add more hosts or press "Done" to close the "New Host" screen.


Figure 6
Figure 11 - Configuring your client PCs (Windows XP)

10. Configuring your client PCs (Windows XP):

To configure your client PCs to use the new DNS Server you will need to make a change to their network settings.

To do this, right-click on "My Network Places" and select "Properties". Then, right-click on "Local Area Connection" and select "Properties". Select "Internet Protocol (TCP/IP)" from the list and click "Properties". The screen shown in figure 11 will be shown.

Ensure that the "Use the following DNS server addresses" radio button is selected and enter the IP address of your new DNS Server into the "Preferred DNS Server" box and press "OK". The client PC will now use your new DNS Server.

Alternatively, where you have access to a DHCP server, you can configure it to issue the IP address of the new DNS server to all your client PCs automatically. This is the preferred method of assigning a DNS server and the method I use in my internal network.

FTP

FTP (singkatan dari File Transfer Protocol) adalah sebuah protokol Internet yang berjalan di dalam lapisan aplikasi yang merupakan standar untuk pentransferan berkas (file) komputer antar mesin-mesin dalam sebuah internetwork.

FTP merupakan salah satu protokol Internet yang paling awal dikembangkan, dan masih digunakan hingga saat ini untuk melakukan pengunduhan (download) dan penggugahan (upload) berkas-berkas komputer antara klien FTP dan server FTP. Sebuah Klien FTP merupakan aplikasi yang dapat mengeluarkan perintah-perintah FTP ke sebuah server FTP, sementara server FTP adalah sebuah Windows Service atau daemon yang berjalan di atas sebuah komputer yang merespons perintah-perintah dari sebuah klien FTP. Perintah-perintah FTP dapat digunakan untuk mengubah direktori, mengubah modus transfer antara biner dan ASCII, menggugah berkas komputer ke server FTP, serta mengunduh berkas dari server FTP.

Sebuah server FTP diakses dengan menggunakan Universal Resource Identifier (URI) dengan menggunakan format ftp://namaserver. Klien FTP dapat menghubungi server FTP dengan membuka URI tersebut.

Cara kerja protokol FTP

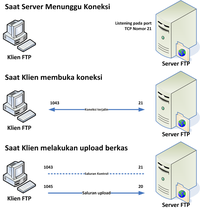
FTP menggunakan protokol Transmission Control Protocol (TCP) untuk komunikasi data antara klien dan server, sehingga di antara kedua komponen tersebut akan dibuatlah sebuah sesi komunikasi sebelum transfer data dimulai. Sebelum membuat koneksi, port TCP nomor 21 di sisi server akan "mendengarkan" percobaan koneksi dari sebuah klien FTP dan kemudian akan digunakan sebagai port pengatur (control port) untuk (1) membuat sebuah koneksi antara klien dan server, (2) untuk mengizinkan klien untuk mengirimkan sebuah perintah FTP kepada server dan juga (3) mengembalikan respons server ke perintah tersebut. Sekali koneksi kontrol telah dibuat, maka server akan mulai membuka port TCP nomor 20 untuk membentuk sebuah koneksi baru dengan klien untuk mentransfer data aktual yang sedang dipertukarkan saat melakukan pengunduhan dan penggugahan.

FTP hanya menggunakan metode autentikasi standar, yakni menggunakan username dan password yang dikirim dalam bentuk tidak terenkripsi. Pengguna terdaftar dapat menggunakan username dan password-nya untuk mengakses, men-download, dan meng-upload berkas-berkas yang ia kehendaki. Umumnya, para pengguna terdaftar memiliki akses penuh terhadap beberapa direktori, sehingga mereka dapat membuat berkas, membuat direktori, dan bahkan menghapus berkas. Pengguna yang belum terdaftar dapat juga menggunakan metode anonymous login, yakni dengan menggunakan nama pengguna anonymous dan password yang diisi dengan menggunakan alamat e-mail.